

Excel2TXF Quick Start Guide
A quick tutorial for using the Excel version of Excel2TXF to get your trades from your broker into your tax software
This tutorial will guide you step by step through the process of exporting your Excel transactions to a TXF file which can then be easily imported into TurboTax or H&R Block At Home software. I think you'll find that this program is straightforward and easy to use. But, if you run into any problems, or have any questions, send me an email.
Step 1: Open the Excel file Excel2TXF.xls. Note that you won't actually be directly using this workbook - you just need to have it open while you're working in the Excel file from your broker. This allows the main macro to be accessible from your broker file. When the file opens you will be asked whether or not you want to enable the macros in the file. You must enable macros for the program to work.
[Note: If you are uneasy about running macros from your computer, consider instead our Full-Service option, and we'll take care of everything for you.]
You'll need to purchase the stand-alone java version instead. If you already paid for the Excel version, just ask for a refund.
Excel 97 or earlier:You need to have at least Excel 2000, but you can use the stand-alone java version instead. If you already paid for the Excel version, just ask for a refund.
Excel 2000, XP, 2003:When you open the Excel2TXF, you'll get a "Security Warning" popup asking you to Enable or Disable macros. You must choose "Enable Macros". If you do not get the security warning popup, you'll need to change your security settings:
- From the Excel menu, select Tools > Macro > Security
- In the 'Security Level' screen make sure that 'Medium' is selected. This will cause Excel to prompt you to decide whether or not to run a particular macro.
Similar to older versions of Excel, when you open Excel2TXF, you'll get a "Security Warning" popup. However, it is not as obvious as it used to be, and it will disappear if you don't address it right away. You'll find it at the top of the workbook. Click the 'Options...' button and then select 'Enable this content' and click Ok. If you aren't given the option to enable the macros, you'll need to change your security settings:
- Click the Office button (top left corner) and select Excel Options.
- Select Trust Center from the left side menu and then click the Trust Center Settings... button.
- Select Macro Settings from the left side menu and then check the box next to Disable all macros WITH notification. This will cause Excel to prompt you to decide whether or not to run a particular macro.
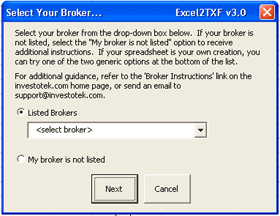
Step 2: Open your Excel file from your broker. Check out our broker page to find specific instructions for downloading the file from your broker. If you don't see your broker listed, send me an email and I'll help you get it figured out.
Step 3: Make sure that your file has the following required columns, which correspond to the required entries on tax form Schedule D. The order of the columns is not important, and any additional columns are not a problem.
- Quantity (number of shares or contracts) [NOTE: This column is optional since some brokers already combine the quantity and description into a single column. For such a case, you just need the description column.]
- Description (ticker symbol or company name)
- Purchase Date
- Total Cost (quantity * share price + commission)
- Sale Date
- Total Sale Proceeds (quantity * share price - commission)
[Note: Some broker downloads just show a separate line for each buy and sell trade. That's just fine - the program will automatically match up the individual buy & sell trades]
Step 4: Run the macro!
- From your broker file, select Tools > Macro > Macros
- In the list of macros, select the name 'Excel2TXF.xls!Run' and then click the 'Run' button
- From your broker file, select View from the top menu
- Click the Macros button (usually at the far right of the toolbar)
- In the list of macros, select the name 'Excel2TXF.xls!Run' and then click the 'Run' button
Step 5: A series of dialogues and forms will then open in a "Wizard" style format to guide you step-by-step through the generation of your TXF file. Just follow the prompts and directions at each step. The whole process will only take a few minutes.
Step 6: Once your TXF file has been created, just follow your tax software's instructions to import the TXF file from the saved location. After the import is complete, you should then check the totals and do a quick spot check of a few transactions, just to make sure everything looks right. And thats it! You're all done!
Purchase the Excel version of Excel2TXF now for only$5.00

If you have any questions or comments, send me an email.